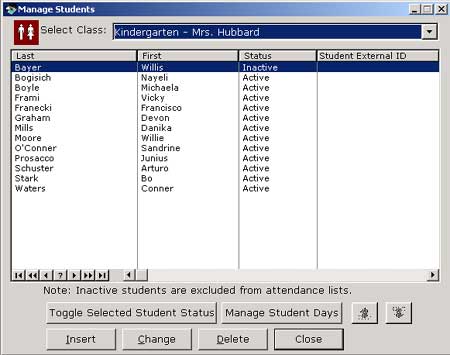
Update and Edit Student
 This is the Update and Edit Student window where you can Add, Edit or
Delete a Student.
This is the Update and Edit Student window where you can Add, Edit or
Delete a Student.
Adding a Student
1. Click the Insert button. Alternately you can click anywhere in the
student list box and right mouse click, then choose Insert . The Adding
Student window will pop up.
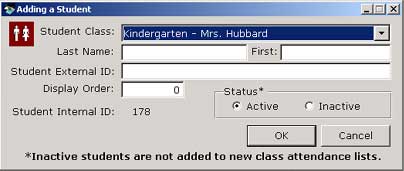
2. Select the Class from the drop down menu to assign the student to a class.
3. Enter Last Name, First Name, External Student ID that is used by the school.
4. Assign a display order for the class list.
5. Besure that Active is indicated in Status. Inactive students are not
added to new class attendance lists.
6. When complete click OK .
Editing a Student
1. Highlight the student and click the Change button. Alternately you
can highlight the student and right mouse click, then choose Change
. The Change Student window will pop up.
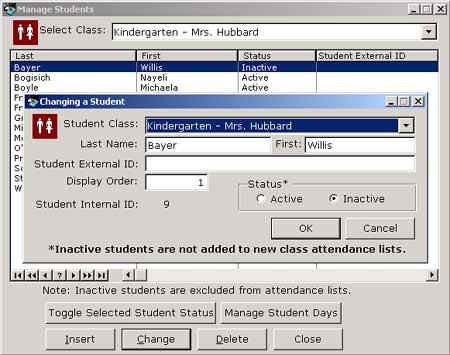
2. To move a student to a different class, from the drop down menu select the
new class to which to assign the student.
3. To change a student's name, delete the old name and type the new name in
the Last Name text area.
If a student's last name changes, you may need to change the display order if
you have it arranged alphabetically.
4. To change a student's status, highlight the student and use the you can use
the Toggle Student Status button making the student inactive
, or active .
Deleting a Student
Warning: This operation CANNOT BE REVERSED and will delete all student-day
records and effects all past reports! Consider making a student's
Status Inactive instead of deleting. (See Editing a Student
above).
1. To Delete a student, highlight the student name.
2. Click the Delete button. A Warning Box will pop up.
3. If you are sure you want to delete the student click Yes .
4. In order for these changes to take effect you will need to reopen or refresh
the Class Attendance window.
Go to Manage
Student-Days
to manage Student days.